
A product has been added to the basket
Christmas Craft Tips: Send A Handmade Card This Year!
Christmas Craft Tips: Send A Handmade Card This Year!
Christmas time is here once again, which means it’s time to get in touch with your friends and family to wish them all the best for the festive season. Why not make things extra special by adding a personal touch and sending them a handmade card? It’s easier than you think and you don’t need to splash out too much cash to put a new twist on an annual tradition. To help you out with some ideas we asked some of the best craft bloggers around for their tips and tricks to create great cards this Christmas. Each day we’ll post a new tip, so stay tuned over the next week!
Day Six: Gelli Printing Card, by Anita Mistry at Itsamistry Design Studio

Our final tip comes courtesy of Anita Mistry, who wanted to share her use of Gelli Printing Plates for one of her recent cards.
She shows us how with very little experience, you can create some wonderful cards with a few blobs of paint, a roller, some stencils and the Gelli gel printing plate.
- Cover the gel plate in acrylic paint. You don’t need much, as little more than a small ball will spread easily and cover the whole plate.
- Attach your paper to the plate and rub it gently to transfer the colour.
- Then cut out your stencils. Anita used a number of triangles so she could create a group of minimalist Christmas trees.
- Place these stencils on top of the gel plate and colour over it in a lighter coloured paint as this means that when you transfer the light colour to your paper, the darker base will be left as the stencil sections (here, the darker bodied Christmas trees).
- With this done, you can now go over your trees in a darker pen, add detail and crop the ends to make things perfect.
Of course, you don’t have to create Christmas trees as you can cut your stencils into any shape and mix your colours into anything you’d like! We hope you’ve been getting creative this holiday season and made your own cards for your friends and family. Merry Christmas from all of us at Pen Heaven!
Day Five: Cut-out Christmas Tree Card by Sarah Campbell at Sarah Campbell Designs
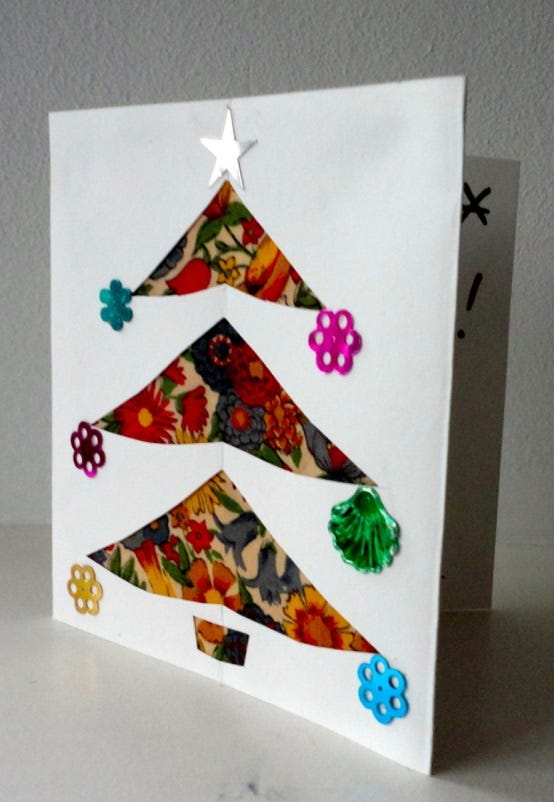
Everyone has wrapping paper left over after taking care of their presents, so here’s a craft tip to turn leftover sheets into great Christmas cards, courtesy of Sarah Campbell.
- To start, fold the paper in half lengthways and cut along the line.
- Then fold the paper into thirds so that each section is a nice sized square.
- Lightly fold the end segment in half so that you can mark out in pencil the sections of the Christmas tree. With the paper in half, you ensure both sides will be equal, but be sure the crease doesn’t indent the card too much.
- Cut the tree segments out to form the card’s cover, then cut your wrapping paper and affix it to the paper so that the pattern comes through the tree segments on the front, as pictured. Sarah recommends using double sided tape to hold the wrapping paper and then glue to affix the cover flap over it, making your card cover complete!
- All that’s left is to decorate the tree and right your message inside.
This card is simple, but you can create many variations from it. Sarah used sequins to decorate her tree but you can also try glitter, stickers or finishing the decorations in pen as well as all kinds of material for the body of the tree.
Day Four: Pom-pom Reindeer Cards, by Gude at Hodge Podge Craft
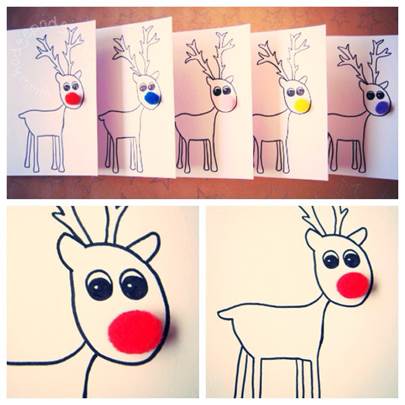
Up next we have an adorable little card that anyone in the family can make. All you need is some glue, a pen and a small pom-pom for the nose. If you don’t feel confident drawing the image from scratch, or you’re making the card with a child, you can use the printable template available on Gude’s blog!
This card is great if you want something simple you can easily make in about 10 minutes.
As you can see from the image, Gude made a whole family of reindeer in no time at all, each with different coloured pom-poms. Even if you aren’t using the template, you can draw any image on a test piece of paper and so long as it is bold enough to be seen through another piece for your card, you can trace over it in pencil before finalising the drawing in pen.
Get the kids involved by trying out different templates and seeing who can decorate them the best, such as Christmas trees or snowmen!
Day Three: Scrabble Christmas Card, by Claire Wilson at claireabellemakes
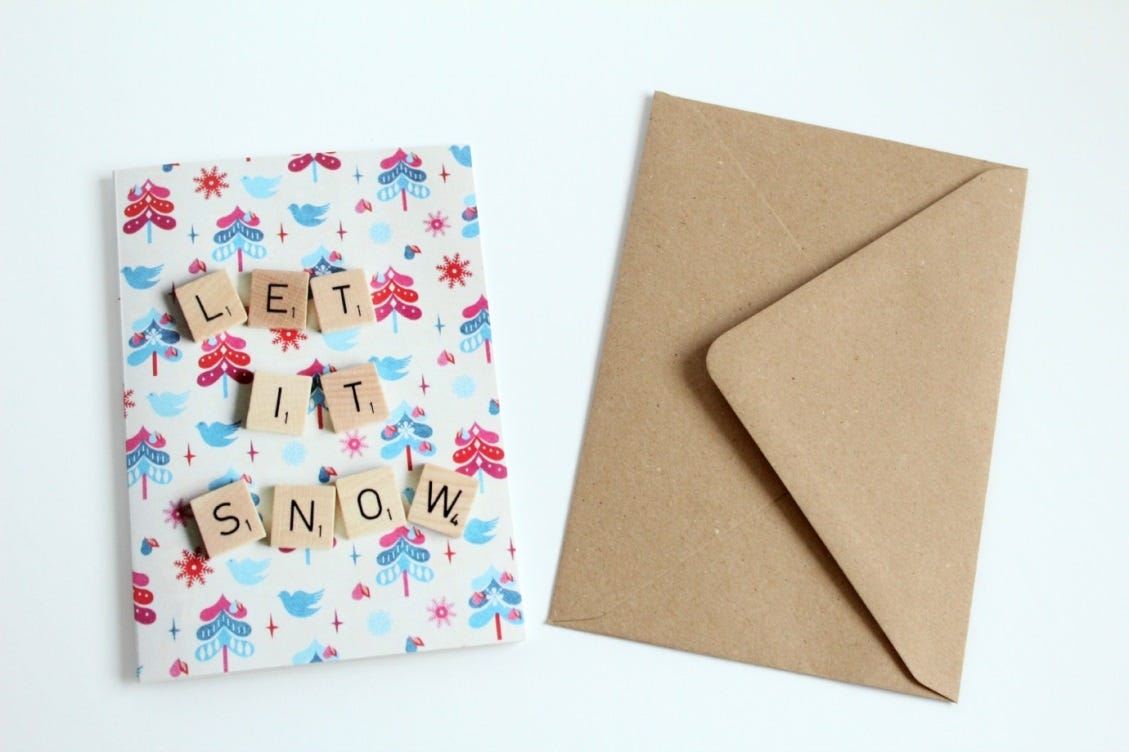
Another chance to dust off something old and turn it into something new. This time, Claire Wilson has taken old Scrabble tiles and used them as inspiration:
“Scrabble is my favourite word game, so I really wanted to find a way to incorporate this into some stationery and specifically Christmas cards! I started with some patterned paper, then laid out wooden Scrabble tiles and photographed the image.”
We love the Scrabble tiles as they’re easily rearranged and can lend an added dimension to spelling out a simple message on the front. Claire worked with a printing company to create her cards, but if you’re making your own for just a few friends or family, you can achieve the same effect printing the image you take onto glossy or matte paper.
“I love how the image looks almost 3D! I sell the cards in my store and I'm already thinking of a bigger range of greetings cards to make!”
Why not try searching through some of those old toys and seeing what you can create for the front of your card? Just be sure the picture you take is bright enough for everything to be clear and you should be all set.
Day Two: Christmas Tree Poetry Card, by Chris Pearson
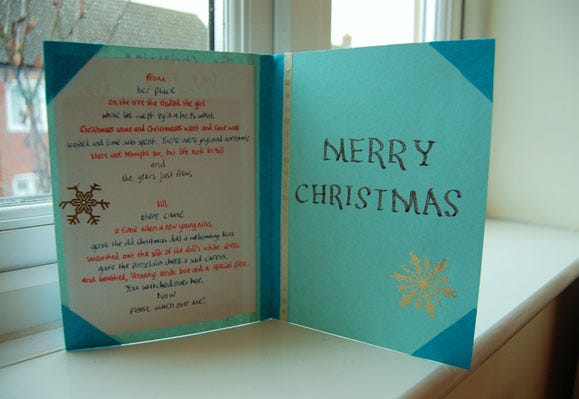
Now it’s time to flex your writing muscles. You don’t have to be the next Wordsworth, but there’s almost no more personal way to get back in touch with someone than writing a poem for them! Chris Pearson did just that with her Christmas Tree Poetry card:
“I've been writing poetry for a number of years and have accumulated a number of poems on the theme of Christmas in my new book (A Christmas Collection). ‘The Christmas Tree Fairy’ was originally longer, so I have cut out two verses to make it more viable as a card without losing much of the message.”
“The idea of presenting the poem as a series of Christmas trees (which can be set out horizontally or vertically) was an improvement on the original idea, which was to have the whole poem set out as one big Christmas tree. Of course, that would have been far too big for a card!”
You can try this out at home yourself with some blank paper to make sure the poem is highly visible; whichever colour you write it in. Then you can mount the paper onto different coloured card to bring some variety to it, without compromising your lovely handwriting! Afterwards it’s time for the finishing touches: “As for the decorations, I decided to use alternating green and red inks for each line of the poem and some golden snowflake decals to give the whole thing a Christmassy feel!”
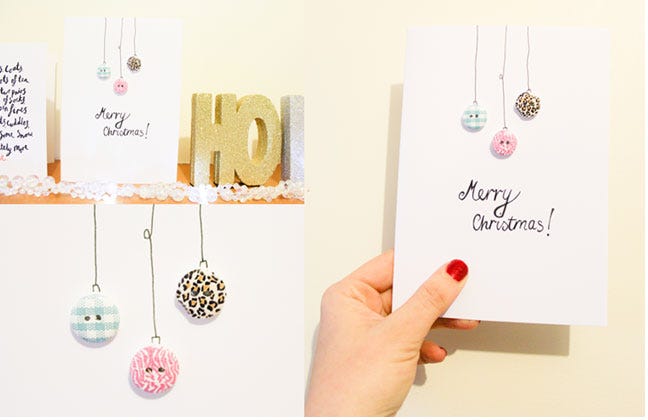
Day One: Button Bauble Card, by Kate Gardiner at Beak Up Crafts
We start off with this lovely touch from Kate Gardiner.
Nothing much needed to get going with this design:
"This is a really quick and easy card to make. All you need is a blank card, a fine black ink pen, three buttons and some glue."
Finally a chance to use up some of those odd buttons you have lying around, as well as show off some of your calligraphy skills!
“Decide where you want the buttons on your card then glue them in place. Once the glue is dry, draw the top of your baubles above each button, then draw in the string. Write the Christmas message of your choice underneath. I stuck to the classic Merry Christmas!”
For your own spin you can try finding buttons of different sizes and drawing your own Christmas tree. You’ll be able to spice it up by drawing some lights and tinsel with different coloured pens, but keep the 3D effect of still using the buttons.

Rollerball vs. Ballpoint Pens: A comparison July 17, 2013

Refill Guide September 2, 2015


Fountain Pen Nib Width Comparison August 4, 2015

Lead Sizes for Mechanical Pencils October 19, 2015

Cutting Edge - Unconventional Pen Materials April 18, 2024
Egg-straordinary Stationery March 21, 2024

LAMY safari's Spring Awakening April 26, 2023

Flair for Fashion March 8, 2023
Comments
Thanks so much for featuring my card design! Hope you have a lovely Christmas! x
[…] little while ago the lovely folks at Pen Heaven asked me if I would design a literary Christmas card for them. Of course, I jumped at the […]
Thank you for sharing our pompom reindeer. I love the DIY Scrabble card and the button bauble one too! :)
Fabulous set of cards thanks for sharing my gelli print card. Merry Christmas Anita